 Number 297 - February 2008 |

|
| Partitioning Disk Drives With Vista | |
|
by Vinny La Bash, | |
|
Partitioning disk drives is a subject that makes people nervous. It's always accompanied by scary warnings to back up everything before you begin because if you make even one tiny little mistake, everything on your system will be lost forever with no chance of getting it back, ever. Your spouse will seek a divorce, your children will shun you and your neighbors will sign a petition to force you to move out of the neighborhood. Perhaps there is some exaggeration here but anyone who remembers DOS knows that partitioning drives with FDSK was often nothing short of a nightmare, even for experienced professionals. Windows 95 wasn't any better. XP has a Disk Management console that lets you create partitions using any free or unallocated space on your drive. However, if your drive has a single partition that takes up the entire drive, the Disk Management console is stymied, and you need a third-party utility such as Partition Magic. Vista's Disk Management is equipped with a console tool that lets you repartition your existing drives in any way you desire. You can create new partitions, extend or shrink existing ones, and even reformat entire partitions without putting your data in danger of loss. Go to the Desktop, right-click on My Computer, then select the Manage command from the context menu. Double click on Storage, and again on Disk Management. You will get a dialog box similar to Figure 1. You are now ready to proceed. 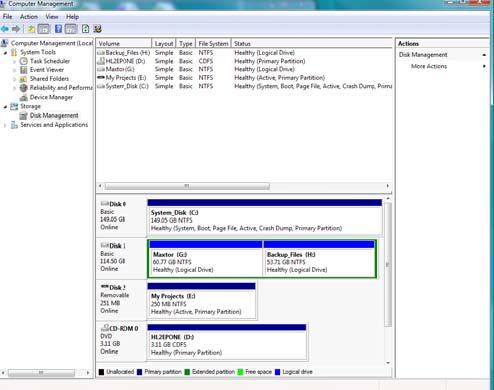
Figure 1 Examine the C: drive to determine that it is configured as a single partition. If this matches your own configuration, follow the steps as outlined. If it doesn't you can still create partitions. You will get similar different dialog boxes. Take your time, read the screen carefully, apply common sense, and you should be fine. To divide a disk into two or more partitions, right-click on the dark blue bar and select the Shrink Volume command. You will then see a temporary dialog box informing you that Vista is making some calculations to determine if there is enough space to create the new partition. When Vista is finished calculating, you will see the Shrink dialog box. It should resemble Figure 2. Let's examine the entries in the Shrink dialog box because things are not necessarily what they seem. The number in the Size of available shrink space text box tends to be very misleading. It will rarely correspond with the amount of free space available. The discrepancy can be as large as 10:1. This is because Vista works with a variety of system files that take up significant amounts of space. The main culprits are shadow copy files, page files, restore files, and hibernation files. |

Figure 2 Is there a way to improve the situation? Maybe. Shadow files are genuine Microsoft gibberish for System Restore files. You can reduce the effect this has on free space simply by turning off the System Restore function in Control Panel. The system will then stop producing files that record restore points. Remove these files with the Disk Cleanup tool. After you finish partitioning your system, you can turn System Restore back on again. The page file is another term for virtual memory that has been around since Windows 3.1. The page file is disk drive space masquerading as additional memory for the system to use when it runs out of real memory. Page files can be huge in Vista. Several gigabytes are the norm. You can relocate the page file to another hard disk by right-clicking on My Computer, selecting Properties, Change settings, and clicking the Advanced tab. Restart your system, and your system performance will improve slightly. You can turn off the hibernation feature with Control Panel and free up additional space. Defrag your system and use the Disk Cleanup tool to delete all unnecessary files. You may still not have improved the amount of space to allocate to another partition very much. The reason for this is that under normal circumstances the types of files under discussion are normally marked as unmovable. If they are located in the middle of the free space on the disk, only the space on the other side of the files will be available for a new partition. Even after these files are removed, the Disk Management console tool doesn't seem to have enough brains to figure out that more disk space is now available. If this is the case, you may have to resort to a third party utility to repartition your disk. Let's say however that the Shrink dialog box is displaying an amount of space acceptable for a new partition. Click the Shrink button, and take the dog for a walk. Eventually, the Disk Management tool will update its display, and you'll see the new partition as unallocated space. The new partition is unusable in its present form. Right-click on the new space, and select the New Simple Volume command. The New Simple Volume Wizard appears. This well designed utility will walk you through the rest of the steps necessary to create your new partition. Click Next and follow directions. If you're not sure what the tool wants, simply accept the defaults and keep going. In due course, the final panel will appear. Click Finish and your new partition will be available for use like any other disk drive. Copyright 2008. This article is from the November 2007 issue of the Sarasota PC Monitor, the official monthly publication of the Sarasota Personal Computer Users Group, Inc., P.O. Box 15889, Sarasota, FL 34277-1889. Permission to reprint is granted only to other non-profit computer user groups, provided proper credit is given to the author and our publication. |
|
Number 297 - February 2008
|
|