 Number 219 - August 2001 |
|
| Magnify The Problem? | |
|
George Skarbek, (gskarbek@melbpc.org.au)
February 2001 PC Update, Melbourne PC User Group 
| |
|
Have you ever wished you
could somehow magnify part of the screen? Wouldn't it be marvellous to
see that text a little larger sometimes... just a little clearer.
Some of our members are over 21 years of age. Eyesight is not quite as good as it was when they were teenagers and small fonts on the screen can be a problem at times. In applications such as Word this is not a problem because you can increase the magnification of the text to any size you like. For me 123% is a good figure. This is entered via the Zoom dialogue box in Word. The problem comes when you are entering a Web address where the font is small or where you have the problem of viewing Web pages that contain 6 of 8 point fonts. You have typed what you believe is a correct Web address and the page is "not found" - you suspect that you may have used a comma instead of a full stop but this is too hard to see in the small type. A 19" or 21" inch screen is one solution but very expensive. Wouldn't it would be nice if you could zoom in on this part of the screen with just one keystroke. The good news is that you probably can, and the better news is that this fix costs nothing. If you have Windows 98, Windows Me or Windows 2000 you can set up your own magnified part of the screen as this feature is included in Windows. No, you didn't read that incorrectly, it is true that you may already have this feature on your machine. Unfortunately it was not included with Windows 95. The program is called "Magnifier" and you can set both the degree of magnification and the size of the magnified area. There are several steps involved in setting up and using Magnifier, but no part of it is complex. To use the Magnifier simply click on the Start menu, Programs, Accessories, Accessibility, (Figure 1). If you know how to create shortcuts and you're comfortable exploring new software, go to it now, and enjoy.
Figure 1. When installed, Magnifier is accessible via the Accessibility menu. (See larger more readable figure above) Not Installed? If you don't find it, this could mean the Magnifier may not have been installed during the your Windows installation. To add the Magnifier, click on Start, Settings, Control Panel, Add/Remove Programs, Windows Setup then highlight Accessibility. Click on Details and place a tick in the Accessibility checkbox. Then click on the Details box to ensure you have Accessibility Tools highlighted. Click OK twice. (Figure 2.) Dependent upon your installation, you may be asked to insert the Windows CD-ROM for Magnifier to be installed. 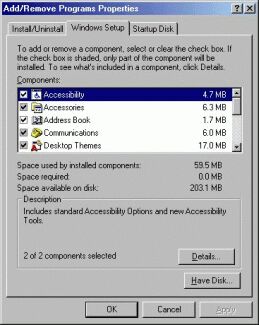
Figure 2. Installing Magnifier. Shortcuts Make Life Easier Using the Magnifier by going all the way from the Start menu every time is a tedious method and acceptable in my opinion only for very occasional use. If you find you are using it often, a desktop shortcut simplifies and speeds up access. This is how to create the shortcut. When you have the name Magnifier visible in your Accessories menu, right-click on it and select Create Shortcut from the popup menu. A new menu item named "Magnifier (2)" |
will appear under the original. In Windows
98 you can create a shortcut for the desktop by holding down the left
mouse button and dragging that new menu item "off" the menu, onto the
desktop.
The icon on the desktop will now make the Magnifier more accessible. There is further improvement you can make because if you have another application open on your desktop (say) Internet Explorer, you cannot see the icons on the desktop to get to your Magnifier. One way of doing it is to press the Windows key + m to minimise all programs, click on this icon and press Shift + Windows key + m to restore all, but there is a better way. The best way to quickly run commonly used programs, in my opinion, is to assign them a shortcut key (sometimes referred to as a Hot key) so that they are always available by a keystroke. Firstly you must drag your new icon over onto the Windows Start button. Now when you click on Start, Magnifier will be included the first menu that appears. (Figure 3) Right-click on the Magnifier from that menu, select Properties, click on the Shortcut Key textbox and then press the Control key. You will see Ctrl + Alt + appear and then press the key you wish to use, say "m" in this case. (Figure 4) This will now enable you to press Ctrl + Alt + m from anywhere whenever you need the Magnifier. 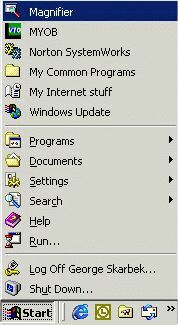
Figure 3. Adding Magnifier to the Windows Start Menu Hot Key When the Magnifier runs for the first time it will occupy the entire width of the top of the screen. This is quite limiting in many cases but the size can be reduced, or even increased, by dragging it down and then resizing it. This step can be a bit messy and may take a little patience because if you move the magnified portion of the screen too close to the edge of the screen it will dock itself to that edge. 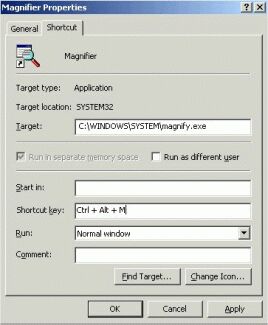
Figure 4. Setting up the shortcut (Hot) key. You can change the magnification level as well as some other options and make it start without its menu. To remove the Magnifier from your screen, right-click in the magnified section and select Exit from the pop up menu that will appear. Remember that by pressing Ctrl + Alt + m you can immediately bring it back and it will remember its last screen position. The sample shown in Figure 5 is with 3x magnification. Reprinted fromthe February 2001 issue of PC Update magazine of Melbourne PC User Group, Australia |
|
Number 219 - August 2001
|
|