 Number 198 - November 1999 |
| ReadMe.1st: Oops!, Part 1 | |
| by Ken Johnson,Tulsa Computer Society, From the February 1997 issue of the I/O Port Newsletter | |
|
Editor's Note: From the date on this article you can see that this is not a cutting edge article, since it was written two and three quarter years ago, almost a lifetime in computer-years. However, it covers some fairly basic ideas and things you can do with your system to save yourself from disasters. We almost put this in the Beginners section, but then decided that the operations described are little more than novice level, so placed it here. Beginners should seek advice and any help needed from other User Group members--see the Help Line on page 11. The author assumes that most of you are using Windows 95, but understands that some of you may still be using Windows 3.1 and some even, gasp, DOS! Windows 98 had not yet entered the picture, but most of the material still applies--certainly to Win 3.x and Win 95. "OOPS!" One of the worst things you can utter while sitting at your computer, particularly if you've mistakenly deleted a necessary file or (worse yet) formatted a disk with data on it. However, there are some things you can do to prepare for, prevent, and recover from such disasters -- in DOS, Windows 3.1, and Windows 95. This month we'll look at how to prevent and recover from accidental deletes. Delete and Undelete Peter Norton got famous (and rich) by developing the first "unerase" program to recover deleted files. DOS itself didn't include an undelete program until MS-DOS 5.0. UNDELETE was improved in MS-DOS 6.0 to include a "Delete Sentry" TSR that significantly improves the chances of recovering a deleted file. Windows 3.1 includes a Windows version of UNDELETE, typically located in the "Microsoft Tools" program group and under the File menu in File Manager. Windows 95 handles deleted files differently, through a special folder called the Recycle Bin, as we'll see below. To understand why UNDELETE works, it is important to know how DOS "deletes" a file. DEL and ERASE do not physically remove data from the disk, rather the file is "logically" deleted. The information is still there, but the space it occupies is marked as free for reuse. When DOS writes to the disk again, it may write over the "deleted" data. Then it is gone forever. So the key is to recover deleted files as QUICKLY as possible. When a file is deleted, the first character in the file name directory listing is altered (actually replaced with a sigma character). The file's entries in the file allocation table (FAT) are also cleared, though the data on the disk itself is unchanged. Since the FAT entries tell DOS where the file is physically located, from DOS' perspective the file is now "gone." UNDELETE with DOS and Windows 3.1x MS-DOS 6.x's UNDELETE command provides two levels of delete protection: Delete Sentry and Delete Tracking. Both methods work the same in DOS and Windows 3.1x; the difference between DOS and Windows is how you restore the deleted files. Delete Sentry is the highest level of protection. You run UNDELETE as a TSR with the /S switch. When you delete a file, it is moved to a special, hidden \SENTRY subdirectory. Files remain in the \SENTRY subdirectory by default for seven days or until the subdirectory takes up 20% of the available disk space -- at which time the oldest deleted files are deleted. (These defaults can be changes by editing the UNDELETE.INI file.) The lower level of security is Delete Tracking, which works the same way as the MIRROR program did in MS-DOS 5.0. Again you run UNDELETE as a TSR, this time with the /T switch. Delete Tracking keeps a list of a deleted file's clusters. As long as those clusters haven't been reused by DOS, the file can be recovered. Time is critical, because you can never know how soon a cluster will be overwritten and make the file recovery impossible. Delete Sentry is a much safer option than Delete Tracking. If you don't use either method of protection, UNDELETE may still be able to recover a file using the DOS Directory information. However, success is far from certain, and you will not be able to recover a file that is fragmented -- UNDELETE is unable to determine where the other parts of the file are located. When you find you have deleted a file by mistake, as soon as possible rerun UNDELETE. The procedure is a little different depending on whether you are doing it from DOS or Windows. From the DOS command line, change to the directory containing the deleted file. To see a list of the files that can be undeleted, enter: UNDELETE /LIST UNDELETE checks each Undelete method, chooses the highest level available, and shows which files can be recovered. To recover the files, enter the UNDELETE command by itself, or followed by the specific filename to undelete. With Delete Sentry and Delete Tracking you'll be asked if you want to undelete the file; if so, press Y. Delete Tracking will also give you the option of recovering files that only have some clusters available. For anything other than text files you will probably not get anything usable back from a partially recovered file. Never partially recover an executable file then try to run it -- it could seriously damage your system. Directory: C:\UTIL File Specification: *.* Delete Sentry control file contains 8 deleted files. Deletion tracking file not found MS-DOS Directory contains 14 deleted files Of those, 1 files may be recovered Using the delete sentry method PART1 TXT 1953 2-26-90 2:10a ...A Deleted: 7-10-96 4:02a PART2 TXT 1953 2-26-90 2:10a ...A Deleted: 7-10-96 4:02a PART3 TXT 1953 2-26-90 2:10a ...A Deleted: 7-10-96 4:02a ASQTEST EXE 140091 1-08-91 0:07p ...A Deleted: 7-10-96 4:02a ASQTEST HLP 105848 12-19-90 0:07p ...A Deleted: 7-10-96 4:03a NUKE COM 904 6-24-91 10:00p ...A Deleted: 7-10-96 4:03a KEYPRESSCOM 114 5-08-90 12:00a ...A Deleted: 7-10-96 4:03a WAIT10 COM 121 5-08-90 12:00a .... Deleted: 7-10-96 4:31a C:\UTIL-->_ The DOS version of UNDELETE with Delete Sentry will only let you undelete to the same directory from which the file was deleted. (The Windows version lets you undelete to a different directory or drive.) If you have subsequently deleted the directory, you must recreate the directory with the same name and path before running UNDELETE. If you've used DELTREE to delete a whole directory branch, all the files are moved to the \SENTRY directory; to recover those files, you must recreate the direc The least reliable way of recovering deleted files is using the DOS Directory method. However, it is the only alternative if you are not using Delete Sentry or Delete Tracking. UNDELETE will read the deleted directory entries, determine if the first cluster of the file is still available, and attempt to find and put together the remaining clusters of the file. Since the first character of the file name is gone in the Directory, UNDELETE shows it to you as a question mark. When you recover these files, you'll be prompted for the correct first character. 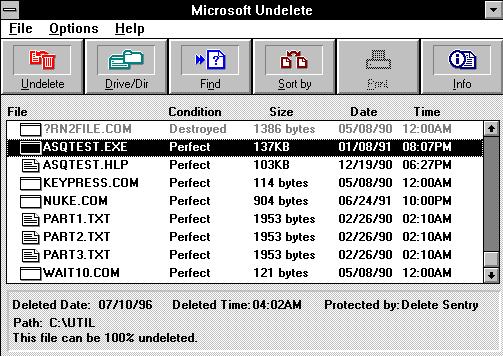 |
The DOS Directory method
of UNDELETE cannot recover files from deleted subdirectories, even if
you recreate the subdirectory first. Since this method has to "guess"
where to find the remaining clusters of the file, it may not correctly
recover the file -- especially if it was fragmented. Never run an
executable file recovered through the DOS Directory method, since if not
recovered correctly it could damage your system. Restore from a
backup.
The Windows version of UNDELETE is simpler and offers more options than the DOS command line version. The Windows version (MWUNDEL.EXE) is typically in a Program Group called Microsoft Tools. There is also an option to include UNDELETE in the File Manager's File menu, which was normally done when you upgrade to MS-DOS 6.x. However, if you don't see the Undelete option under the File menu, you can add it yourself. Edit the WINFILE.INI file in the \WINDOWS directory, and under the [Settings] statement add this line: UNDELETE.DLL=C:\DOS\MSTOOLS.DLL If MSTOOLS.DLL is in a different subdirectory, change the path accordingly. By the way, Backup and AntiVirus are also typically added to File Manager when you upgrade to MS-DOS 6.x, under a new Tools menu. If you don't see this menu and want to add it, again edit the WINFILE.INI file. Find (or create) section called [AddOns], and add the following line under it: MS-DOS Tools Extensions=C:\DOS\MSTOOLS.DLL To undelete a file in Windows, double-click on the Microsoft Undelete icon or select File | Undelete in File Manager. By default UNDELETE will display the deleted files in the current directory. To change directories, use the Drive/Dir button to specify a new directory. UNDELETE shows the deleted files, their condition and recovery prospects, and protection level (e.g., Delete Sentry, MS-DOS). Select the file(s) to restore, and click on the Undelete button. A special note for WFW users: UNDELETE and WFW's 32-bit File Access are not compatible, since UNDELETE requires low-level disk access. To restore a deleted file, you have to either exit Windows for Workgroups or undelete the file to a drive not set for 32-bit file access. Perhaps the easiest way to do this is to undelete the file to a floppy disk (assuming it will fit), then copy the file back to the hard disk. From the Windows version of UNDELETE highlight the file, select File | Undelete To, then specify the floppy drive. A last bit of warning about Delete Sentry. It doesn't move ALL files to the \SENTRY subdirectory; it ignores certain file extensions considered temporary files -- extensions like TMP, SWP, and IMG. These exceptions are listed in the UNDELETE.INI file in the \DOS directory. To protect these files, or to add your own exclusions, edit UNDELETE.INI. On the sentry.files= line, files not being protected are indicated by the file specification preceded by a minus sign, e.g., -*.IMG. Delete any file spec you want to protect, and/or add your own exceptions with the minus sign. Recovering Deleted files with Windows 95 The UNDELETE command is gone from Windows 95. Windows 95 changes how files are deleted, and offers more insurance against accidental file deletion. Don't get too comfortable though, because there is still some room for "Oops!" The Windows 95 desktop includes the Recycle Bin, which stores deleted files. Files move into the Recycle Bin in a couple of different ways. You can drag and drop files on the Recycle Bin icon, highlight the file and press the Delete key, or right-click on the file and select Delete. Files remain in the Recycle Bin until you explicitly "empty" it or until it reaches its disk space storage limit. In the latter case, the oldest files are deleted to make room. Once files are gone from the Recycle Bin, they are gone -- another argument for recovering files quickly. 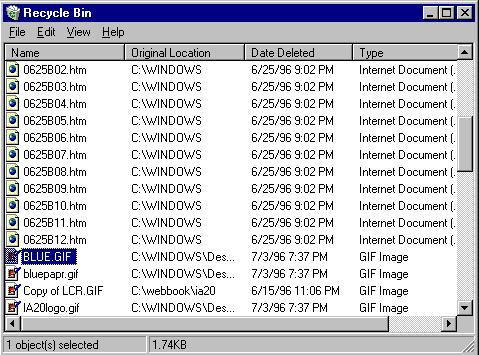 The Recycle Bin's safety net has some holes in it though. Files don't go into the Recycle Bin if they are deleted from the DOS prompt or eliminated by an uninstall program, so they cannot be restored. And the Recycle Bin does not store files from the floppy drives; those files are automatically deleted. You can truly delete files by holding down Shift key when pressing the Delete key -- and, poof, they're gone for good. (If you are concerned about restoring files deleted from floppy disks, there is a work-around. Create a folder on your desktop to serve as an "unofficial" Recycle Bin for floppies. Then, instead of deleting files from floppy, move them to this folder. This will store the files in case you need them back. Of course, this folder doesn't automatically delete items like the Recycle Bin, so make sure to review the contents occasionally and manually delete the ones you no longer need.) To restore deleted files in the Recycle Bin, double-click on its icon on the desktop. You'll see the list of deleted files, their original locations, and deletion date. Highlight the file(s) to undelete, and select File | Restore. The files are restored back to their original locations. There are a couple of configuration changes you may want to make to the Recycle Bin. By default, the Recycle Bin will consume up to 10% of your hard drive, which may be excessive. For most people, 5% is probably sufficient. Right-click on the Recycle Bin, select Properties, then reset the size on the Global tab. If you don't want to be continually prompted for confirmation when you delete a file, also on the Global tab turn off Display Delete Confirmation Dialog. UNDELETE in Windows 95 If you upgraded to Windows 95 on a machine with MS-DOS 6.x, you still have a copy of UNDELETE in the original \DOS directory. It can be run on a Windows 95 computer, with a little work. UNDELETE has to run in MS-DOS mode so it can have direct access to the drive. Other programs have to be "locked" out from the drive. If either of these conditions aren't met, UNDELETE will fail with an error message. Shut down Windows 95, and select "Restart the computer in MS-DOS mode" from the Shut Down menu. At the DOS prompt, change to the appropriate directory and type LOCK. You can now run UNDELETE and use the DOS Directory recovery method. When done, type UNLOCK to unlock the drive, then EXIT to restart Windows 95. Next month, in Part 2, we'll look at Format and, more importantly in an Oops! situation, Unformat. Kenneth E. Johnson is Assistant Editor of the American Bar Association's Network 2d newsletter and Contributing Editor of DOS World Magazine. His book on Web authoring for attorneys will be published by the ABA in the spring of 1997. He is also a coauthor of WordPerfect Law Office Solutions for DOS and of WordPerfect law Office Solutions for Windows. |
|
Number 198 - November 1999
|
|